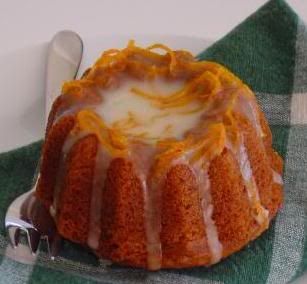
Glazed Orange Rosettes
A few years back I took a stab at starting a cake design business. I lay in bed at night thinking about the kind of cakes I would really enjoy eating, whether I bought them from a cake shop, or whether they were sold in a chi-chi city cafe. I settled on three different creations, each one individual sized, and proceeded to work out the recipes for the cakes of my dreams. I invited six of my close friends over for an afternoon tea (a tradition that is seriously underrated, let me tell you!) and greeted them with a table covered in cakes - a pink one, a chocolate one, and an orange one. I watched pure excitement creep over their faces as I gave them free license to try ALL THREE of the cakes. They sat down, plates in hand, and began to sample my work.
I viewed the table with an overly critical eye - one is always more critical of one's own creations than is necessarily within reason, don't you think? Never the less, I announced that I felt the orange cake was incomplete. My friends immediately put one on their plates, sank their splades into the moist orangey-brown cake and deposited bite sized pieces into their mouths. "Oh no!" they proclaimed. "This one is the best!" Stunned, I listened to why - it was simple, flavourful, uncomplicated. It looked appetising, but not overly indulgent. It was a guilt free cake they'd buy without thinking twice. Amazed, I changed my opinion of the orange rosette, declaring it complete!
I've churned this cake out many times ever since, and it never fails to please. Sometimes it's the simple approach that is best!
Ingredients
1 whole navel orange
125g butter
1 cup castor sugar
1 tsp vanilla essence
2 eggs
2 cup self raising flour
1 cup milk
1 tsp cinnamon
1 tsp mixed spice
Glaze
1 cup icing sugar
1 tblsp hot water
extra grated orange zest
1. Place navel orange in saucepan and cover with water. Boil (whole!) for one hour, checking frequently to ensure water level is maintained and turning ocassionally to ensure orange does not burn on one side. Add extra boiling water when necessary.
2. Remove cooked orange from saucepan, slice in half and allow to cool. Process to a paste with stick blender or in a food processor and set aside.
3. Place butter, sugar, vanilla, eggs, flour, milk, cinnamon and mixed spice in large bowl of electric mixer. Beat on low speed until all ingredients are combined, then increase speed to high to cream mixture for seven minutes. Mixture should become pale, creamy and shiny.
4. Reduce mixer speed to low and add orange paste. Mix until combined.
5. Drop tablespoonfuls of mixture into greased six hole rosette tins (Baker's secret make an excellent six hole tray or individual moulds). Ensure holes are filled to just over half full.
6. Bake in preheated oven at 180 degrees Celcius for 35 minutes or until cooked (skewer comes out clean when inserted into middle of cake). Turn out onto wire racks and flip so that rosette sides are facing up. Allow to cool completely.
7. To make glaze, combine icing sugar mixture in a bowl with zest of half a fresh orange. Add one tablespoon of hot water and mix to combine. Glaze should be thin but not too runny. Add a little extra water if necessary to achieve correct consistency.
8. Drop teaspoons of glaze in centre of top of orange rosettes, then push over sides of cakes to create a drip effect. Decorate with extra grated orange zest and allow glaze to set.
Note: this recipe should produce 12 orange rosettes. They are excellent eaten cold, but can also be warmed in the microwave oven for 20 seconds and served as a pudding with King Island Cream (clotted cream) or custard. They will keep in an airtight container for four days.


Comments